

Navigating Manchester’s Urban Paths
Hello Manchester! Welcome back to a recurring column about navigating our lovely city on foot, scooter, bicycle, etc. A bright sunny day at this time of year is hard to beat. And a little invigorating exercise is always welcome.
This month, I must thank Don Waldron of the Manchester Conservation Commission and the Bike Walk Alliance of NH for major assistance with this column. Now, let’s get into it!
In this edition, let’s talk about:
- Bike to Work Day
- South Manchester Rail Trail Ribbon cutting
- Swytch Kit DIY e-bike conversion
- Tour de NH ride through Manchester
Bike to Work Day

Friday, May 17th was National Bike to Work Day, and here in Manchester it was a popular event. (If you missed it, get ready for next year, May 21st, 2025. And remember, the best day to ride your bike is always TODAY!) Forty-four riders attended the breakfast event outside City Hall — soundly beating 2018’s previous record of 30).

Mayor Jay Ruais stopped by to show his support and chat with riders & commuters. As a runner, the Mayor knows the value of not being too sedentary.

This event was a partnership between the Southern New Hampshire Planning Commission, Queen City Bike Collective, and Manchester Parks and Recreation. Breakfast was sponsored by Trader Joe’s and Li’l Sunny the Camper.
In the afternoon, Queen City Bike Collective provided snacks at their south Elm Street shop.
Below are some snapshots to show what you missed out on!


Ribbon Cutting for South Manchester Rail Trail
Tuesday, May 21st was a glorious late spring day with blue skies and bright sun. My wife and I left our house in the morning with our bikes on their carrier to explore this new section of rail trail before the opening ceremony at 1:00. Put simply: it was beautiful. The rebuilt trestle over Cohas Brook? Is “breathtaking” too strong a word? Maybe. But it offers one of the best views of a little slice of nature inside Manchester, from a viewpoint 41 feet above the Cohas ravine.
![]()
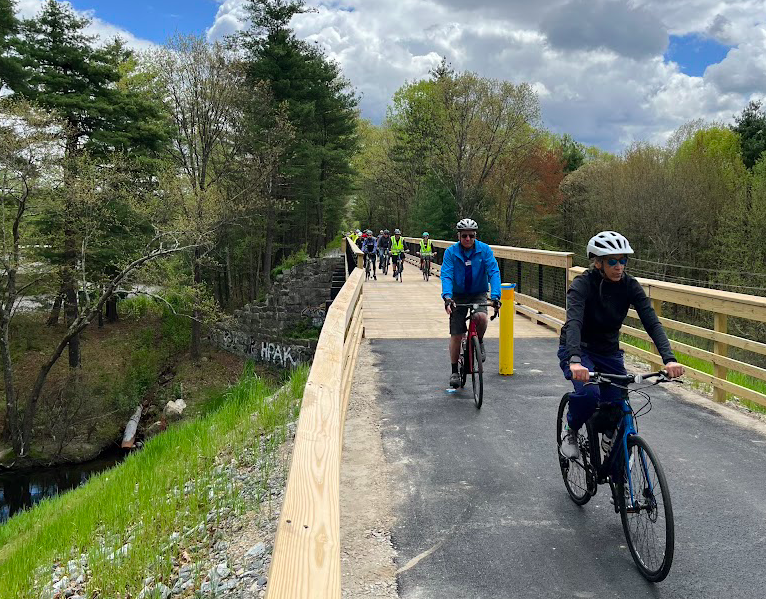
As we rode the trail we saw babies in strollers, many dogs on leashes (all well-behaved), one smiling wheelchair user with a canine companion, pedestrians out for a stroll, runners, and bicycle riders. All of which shows perfectly, I think, what many of us see as the value of a multi-use trail like this.
The rebuilt trestle is the highlight of this section in several ways. It dates back to 1849, so it’s one of the most historic structures in Manchester. After being used for 83 years, the 153-foot-long trestle was rebuilt in 1932.

The last passenger train to cross the trestle traveled in 1967, then in 1989 all rail service ended. The trestle sat abandoned and unused for 34 years, so it had to undergo significant testing and reinforcement to be considered safe for use today. It’s a testament to the engineers involved that they saved and reused such a historic bridge. If you cross this bridge at the right time, you’ll hear shouts of children playing at recess from nearby Founders Academy.

During construction work on restoring this path to useable condition, heavy rain caused a wash-out to a portion of the trail. Engineers had to adapt quickly to minimize disruption and also to strengthen the trail to withstand future similar downpours. Some schedule delays resulted, but the rebuilt path is arguably superior and more sturdy than the original plan.

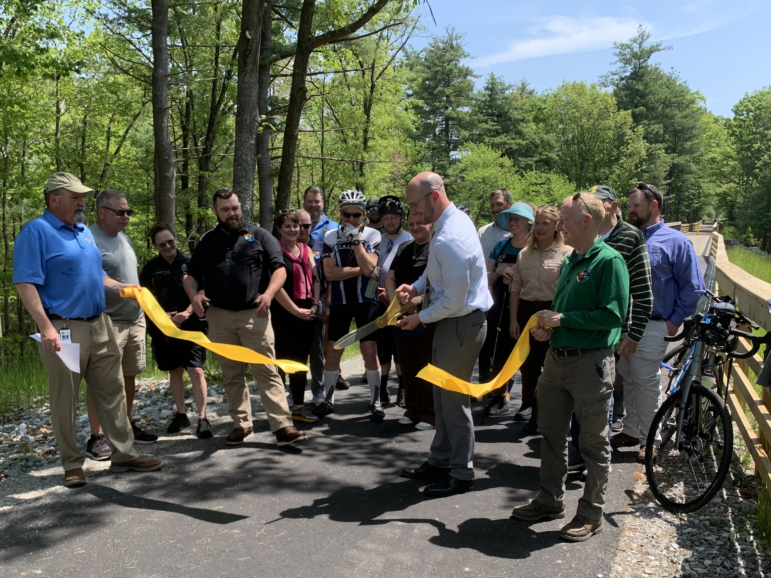
After our ride end-to-end and back, we made it to the ribbon cutting, and it was a well-attended festive event. I spoke to one cyclist who had ridden from Goffstown on a recumbent e-bike. As the ribbon cutting was getting organized, it was interrupted a few times by runners & cyclists passing through. They were uniformly welcomed and waved through.
Manchester Mayor Jay Ruais, as an enthusiastic runner himself, was ardent in his praise: “I love it. This is how we keep families in our city. This is how we get people excited about being here, is utilizing these kinds of things.”
Future work is planned to bring the trail around the airport & connect with the Londonderry Rail Trail. (The old railroad went straight through what is now an airport runway — so that route is probably a no-go.) The connected trails will form a portion of the Granite State Rail Trail, a network of trails that will eventually extend from Lebanon to Salem.
Planning for this project began in 2014. Most of the work was done by two engineering firms:
- VHB did the design work
- CMA Engineering managed construction oversight
Total cost was $3.8 million. Of that, 20% came from the city, with the rest coming from state & federal funds.
To learn more details on this trail click here.

Ribbon Cutting Attendees included, roughly from left to right:
- Caleb Dobbins, Chief Highway Engineer, Manchester Public Works
- Jim Burkush, Ward 9 Alderman
- Officer Anna Martin, Community Police (she arrived on a bike)
- Owen Friend-Gray, Deputy Director, Manchester DPW
- June Trisciani, former Alderman-At-Large
- Tim Clougherty, Public Works Director
- Kelly Koetsier, Parks Department
- Mark MacKenzie, Highway Commissioner & State Representative
- Don Waldron, Conservation Commissioner
- Kari Thurman, Office of Congressman Pappas
- Jay Ruais, Mayor
- Amber Nicole Canaan, Highway Commissioner
- Mark Gomez, Chief of Parks
- Tom Christensen, Board Member NH Trails Coalition & Rails-to-Trails Conservancy
- Frank Koczalka, VHB
- Jason Beaudet, CMA Engineering
The South Manchester Rail Trail can be accessed from many points:
- Spring Garden St
- Mitchell St
- Marguerite St
- Mystic St
- Precourt Park & Driving Park Rd
- north end of Bradley St
- Sentinel St
- intersection & crossing of Gold St (northern end of new section)
- Frontage Rd
- underpass at Goffs Falls Rd
- southern end at Perimeter Rd
Be aware there is little dedicated parking at access points, but nearby parking can be found without too much trouble.
My Experience with Swytch Kit, a DIY e-bike conversion
Spoiler — both my wife and I love this product! Now on with the full story….
I’ve been a big fan of electric bikes and conversion kits since I first discovered MIT’s Copenhagen Wheel project about 15 years ago. I love the elegance of their approach: enhancing tools we already use and understand, rather than introducing entirely new systems with additional complexity.
Recently I discovered the Swytch Kit, and was quickly fascinated.

The Swytch Kit is a DIY kit from the UK that promises to easily add battery-powered electric assistance to virtually any bicycle. Its three main components are shown below:

With the number of hills we have around here, and my aging knees (I hate to admit it, but it’s true), this seemed pretty attractive. Sure, I could buy a dedicated electric bike, but (a) those are pricy, and (b) I’ve already got a bike I’m pretty happy with. The Swytch Kit promised to let me keep my existing bike but easily add some assistance at a reasonable price.
So in June of 2022 I pulled the trigger. Their purchasing model was a little bit arcane. But hey, I love many things arcane, so I was game. First, you have to join a waitlist, and fork over a deposit of $250.
![]()
Then you have to wait several months for the company, Swytch Technology Ltd., to decide it has enough orders to justify the time & cost of manufacturing a batch of kits. You get notified of progress periodically along the way.

And you’re alerted when your order is about to be produced, and given a last chance to verify that details of your order are correct.
![]()
Finally, when your kit is ready to ship, you have to pay the remaining balance, which for me, at that time, was $474 (which included shipping costs from the UK). So my total was $724 to add electric assist to a single bike — and my order included a few extra add-ons, not strictly necessary, that probably boosted the price by about $100. I ordered two kits: one for my bike, and one for my wife’s. (Keep in mind, the prices I’m quoting are almost two years old, so could be different today.)
A month or so after your final payment, your order arrives at your home. From my initial order to receiving the boxes was almost nine months, which according to Swytch is longer than typical. The boxes measure roughly 3 ft x 3 ft x 9 inches, big enough to hold an entire bicycle wheel, well packaged.

Opening the box reveals:

Then a new level of fun begins — the installation. Shocker: it is not as quick or simple as their many online videos make it look. Now, to be fair, it’s not brain surgery, but it does require some patience, some working space, and some tools that not all of us will have (like metric Allen wrenches), and along the way you can encounter other complications like I did. More on that in a moment. But as you go you’ll also be amazed by the thoroughness of their engineering & design to allow their product to work with a huge variety of different bikes.
My complication? The kit contains a new front wheel which replaces your existing one, and this new front wheel’s axle did not fit into the front fork of my bicycle.

Damn! At this point, I had opened the box and already become entranced by all the many alluring parts that promised to make my old bike shiny & new, only to be stopped cold at the earliest step. Oh well. I contacted their support via email, describing the problem and sending along a few photos I’d snapped with my phone. They acknowledged receipt of my question almost immediately and said I’d receive a response within a few business days. And sure enough, I did.
The solution? I needed to file the axle of the new wheel just enough that it would fit into my existing fork. They explained that their axles are designed to fit a 10-millimeter fork, but some forks are only 9 mm wide, so then filling becomes necessary. They even sent me a link to an online video explaining all this and showing how to do it.
I have to admit I did not do precise measurements of my fork nor the wheel. I just filed a bit, tried the fit, filed some more, tried the fit again, and so on, until the axle fit into my fork. And it required only a small amount of filing. From that point onward the installation proceeded as described in their instructions.
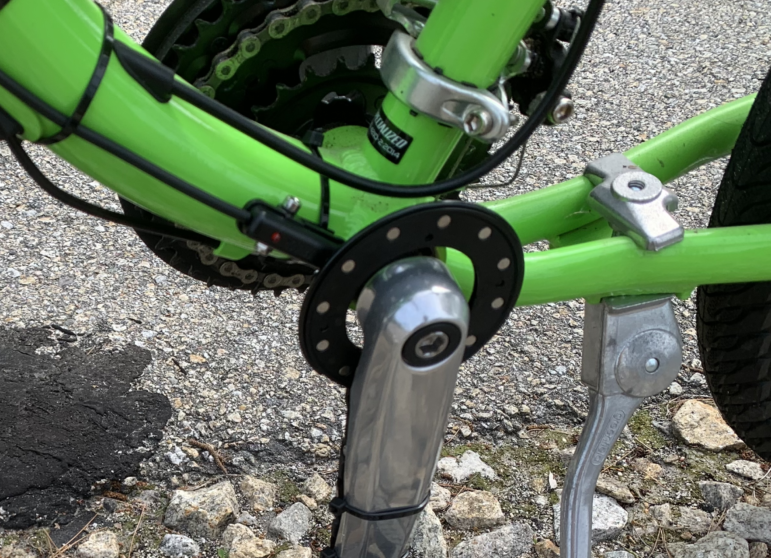
To be clear, the installation still presents some fiddly steps. For example, there’s a pedal cadence sensor that must be installed, and part of it is a plastic ring inlaid with magnets that fits around the crank on the left side of the bike.

Depending on the thickness of the crank, and room available, you may need to install this ring with (1) an extra inner ring, or (2) a thinner extra inner ring, or (3) no inner ring at all. You have to try each of these arrangements and then judge which one works best. Once done, it looks fine, makes sense, and works great. Simple in retrospect. But it is a step that is greatly glossed over in their videos.
After filing my new wheel’s axle and finishing the installation on my bike, I proceeded to my wife’s. My bike is a 20-year-old Marin hard-tail mountain bike, while my wife’s is a 2-year-old Specialized mountain bike with front suspension. On her bike, the new front wheel fit just fine, no filing required, and everything else went smoothly. On my Marin, the pedal cadence sensor ring fit snugly with the thin inner ring, while her Specialized had no room for the inner ring, so the pedal cadence ring had to be installed without it. Still, the end result worked fine.

I have to admit I let life and laziness get in the way of my filing exercise. But with spring approaching I finally tackled it. And this week we took both bikes out for a ride. They were great. Note: once this system is installed, you can still ride your bike in a completely conventional way, with the system turned off, or even with the battery removed. When the battery *IS* present *AND* the system is turned on, you can choose from six different levels of pedal assist, numbered from zero to five.

Level zero is, as you might guess, absolutely no assist at all, which is great for flat or downhill stretches when you don’t need the assist and want to conserve battery power.
When you face some uphill slope, a single button press on the handlebar-mounted control will increase your pedal assist level by one step. Five presses and you’re at the max. At the top level of five the amount of assist is quite noticeable. It’s like a strong invisible person is running silently behind you and pushing. If you stop pedaling, the assist stops. If you start pedaling again, it takes the sensor maybe 1/2 a second to detect that and then the assist comes back on.
At maximum level 5, the wheel supplies 250 watts of power and 40 newton-meters of torque. A very noticeable boost. Consider that a beginning cyclist alone may produce 75-100 watts by pedaling, while a fit cyclist will produce more than 100 watts.

The Swytch Kit applies power when you’re pedaling. It doesn’t care what gear you’re in, it doesn’t care whether you’re going uphill or downhill, riding straight or in a curve, it doesn’t care how hard you’re pedaling. So in some ways, it’s very simple. It has a top-speed cut-off at 15 mph, above which it applies no power at all. And it does pay attention to your cadence: as you pedal faster, the amount of assist decreases (since maintaining speed requires less power than accelerating). In my experience that decrease in power is barely noticeable.
Oh, one more thing. The Swytch Kit is virtually silent, even when providing maximum assistance.
Weight? About 6 1/2 pounds. That includes everything, the motor on the wheel, the sensors, the battery holder, and the battery. Roughly the weight of a 6 pack. The lithium-ion battery itself, which is designed to be easily removable, weighs 2 1/2 lbs. It provides 36 volts, and when fully charged holds 180 watt-hours of power.
Distance? Swytch claims 30 km or about 18 miles. This will vary of course with the level of assist used, the hilliness of terrain traveled, the weight of the bike and the rider. Swytch’s range estimates are based on riding over flat ground at level 2 assistance. Personally, if I’m on flat ground, I’d use zero assist, saving that help for when I need it more. Well, maybe I’d use some when accelerating from a standing stop. At any rate, when riding with maximum (level 5) assist over hilly terrain, the estimated range drops to 6 miles. Note also that they offer a few different battery sizes, some smaller than mine, some larger.
Swytch also sells a variety of accessories, such as adapters that let you mount the battery behind your seat post, or to your frame using bottle cage bosses, freeing up space on your handlebars. They also sell extra batteries, larger batteries, and a handlebar-mounted throttle.
Some similar products produce friction when powered off, due to interactions among the magnets in their motors. The Swytch seems to have an extremely low amount of such friction. You can hold the front wheel off the ground, give it a spin by hand, and it spins pretty freely. So the Swytch adds very little handicap to your bike, beyond the 6 1/2 pounds of extra weight.
Your experience may differ, and will very much depend on your routes and riding patterns. But it is very much worth your consideration.


Tour de NH ride through Manchester


As part of National Bike Month (May), a series of bike tours introduced riders to the rail trails around the Granite State. The event takes its name from the Tour de France and nods to New Hampshire’s French-Canadian connections. The mission was to give people a safe and fun place to explore bicycle riding and see some of the amazing trails available in our state.
The Manchester leg of this series was a big success. Twenty-seven cyclists pedaled 18 miles throughout Manchester in just over 3 hours. Some came from as far as Connecticut.
The Queen City has more rail trails than any other community in New Hampshire but often requires the use of on-street bike lanes to reach your destination. Many people are uncomfortable with those situations and may be worried about navigating the city independently. We could give people “safety in numbers” through the Tour de New Hampshire rides. They knew this was not a race and we would not leave anyone behind.

Our ride started in Arms Park and had our first stop under the Bridge Street bridge, where we heard from Jyl Diane, a local artist who painted murals on the bridge piers. Our next stop took us to the Hilton Garden Inn; on the way, the Manchester Police Department Community Policing Division stopped traffic on Granite Street while we crossed as a group.

At the Hilton Garden Inn, we met with the General Manager from the Fisher Cats, who talked about the team, the stadium, and the relationship with the City.

We next crossed the Hands Across the Merrimack Bridge on our way to the Singer Family Bridge.

We then continued several miles into Goffstown before stopping to talk about the history of railroads, their fall, and the subsequent rise of the “Rail Trail” revolution. The group also learned about active transportation and how many people bicycle commute from places like Goffstown to Downtown Manchester.

The group returned to Downtown before heading south to see the newly completed South Manchester Rail Trail and its newly restored trestle bridge.
After discussing the future rail trail connections to the Londonderry Rail Trail, the future Granite State Rail Trail, and eco-tourism, we made our way downtown, stopping next at Queen City Bicycle’s Community Bike Shop to learn about their mission while recharging with some refreshments.
After making a loop through downtown, we stopped at the “Greetings from Manchester” mural on Hanover Street before making our way back to Arms Park. Many people who only knew Manchester by reputation were surprised to see the beautiful places, the friendly and diverse people, and the various neighborhoods and businesses that make up our city.
Some great people helped facilitate the Manchester ride:
- Tammy Zamoyski (Southern NH Planning)
- Paul Susca (Bike Walk Alliance of NH)
- Elyza Agosta (Queen City Bicycle Collective)
- Florian “Flo” Tschurtschenthaler (Queen City Bicycle Collective)
The ride series was sponsored by several state-level bicycle advocacy groups, including Granite State Wheelers, New Hampshire Rail Trails Coalition, Southern NH Planning Commission , and the lead sponsor, Bike-Walk Alliance of New Hampshire. All organizations contributed time, labor, and finances to make this event a success.
Call for Input
We very much want to hear from you! Do you have any questions or concerns? What topics would you like us to cover? Send your feedback our way and we’ll get on it! jeffreycrogers@me.com We want to ensure this column meets your needs.
Stay safe and have fun out there!